
In today’s data-driven world, the ability to access, unify, and act upon your customer data in real-time is no longer a luxury – it’s a necessity. Businesses often grapple with siloed data, complex ETL processes, and outdated insights, hindering their ability to deliver truly personalized experiences and make informed decisions.
At Ateko, we are Salesforce experts and we understand these challenges. That’s why we’re excited to dive into the transformative power of Bi-Directional Zero-Copy with Salesforce Data Cloud. This innovative approach revolutionizes how you interact with your data, eliminating the need for costly and time-consuming data replication.
What is Bi-Directional Zero-Copy?
Imagine a seamless flow of information where your data is always accessible, always current, and never duplicated. That’s the essence of bi-directional zero-copy.
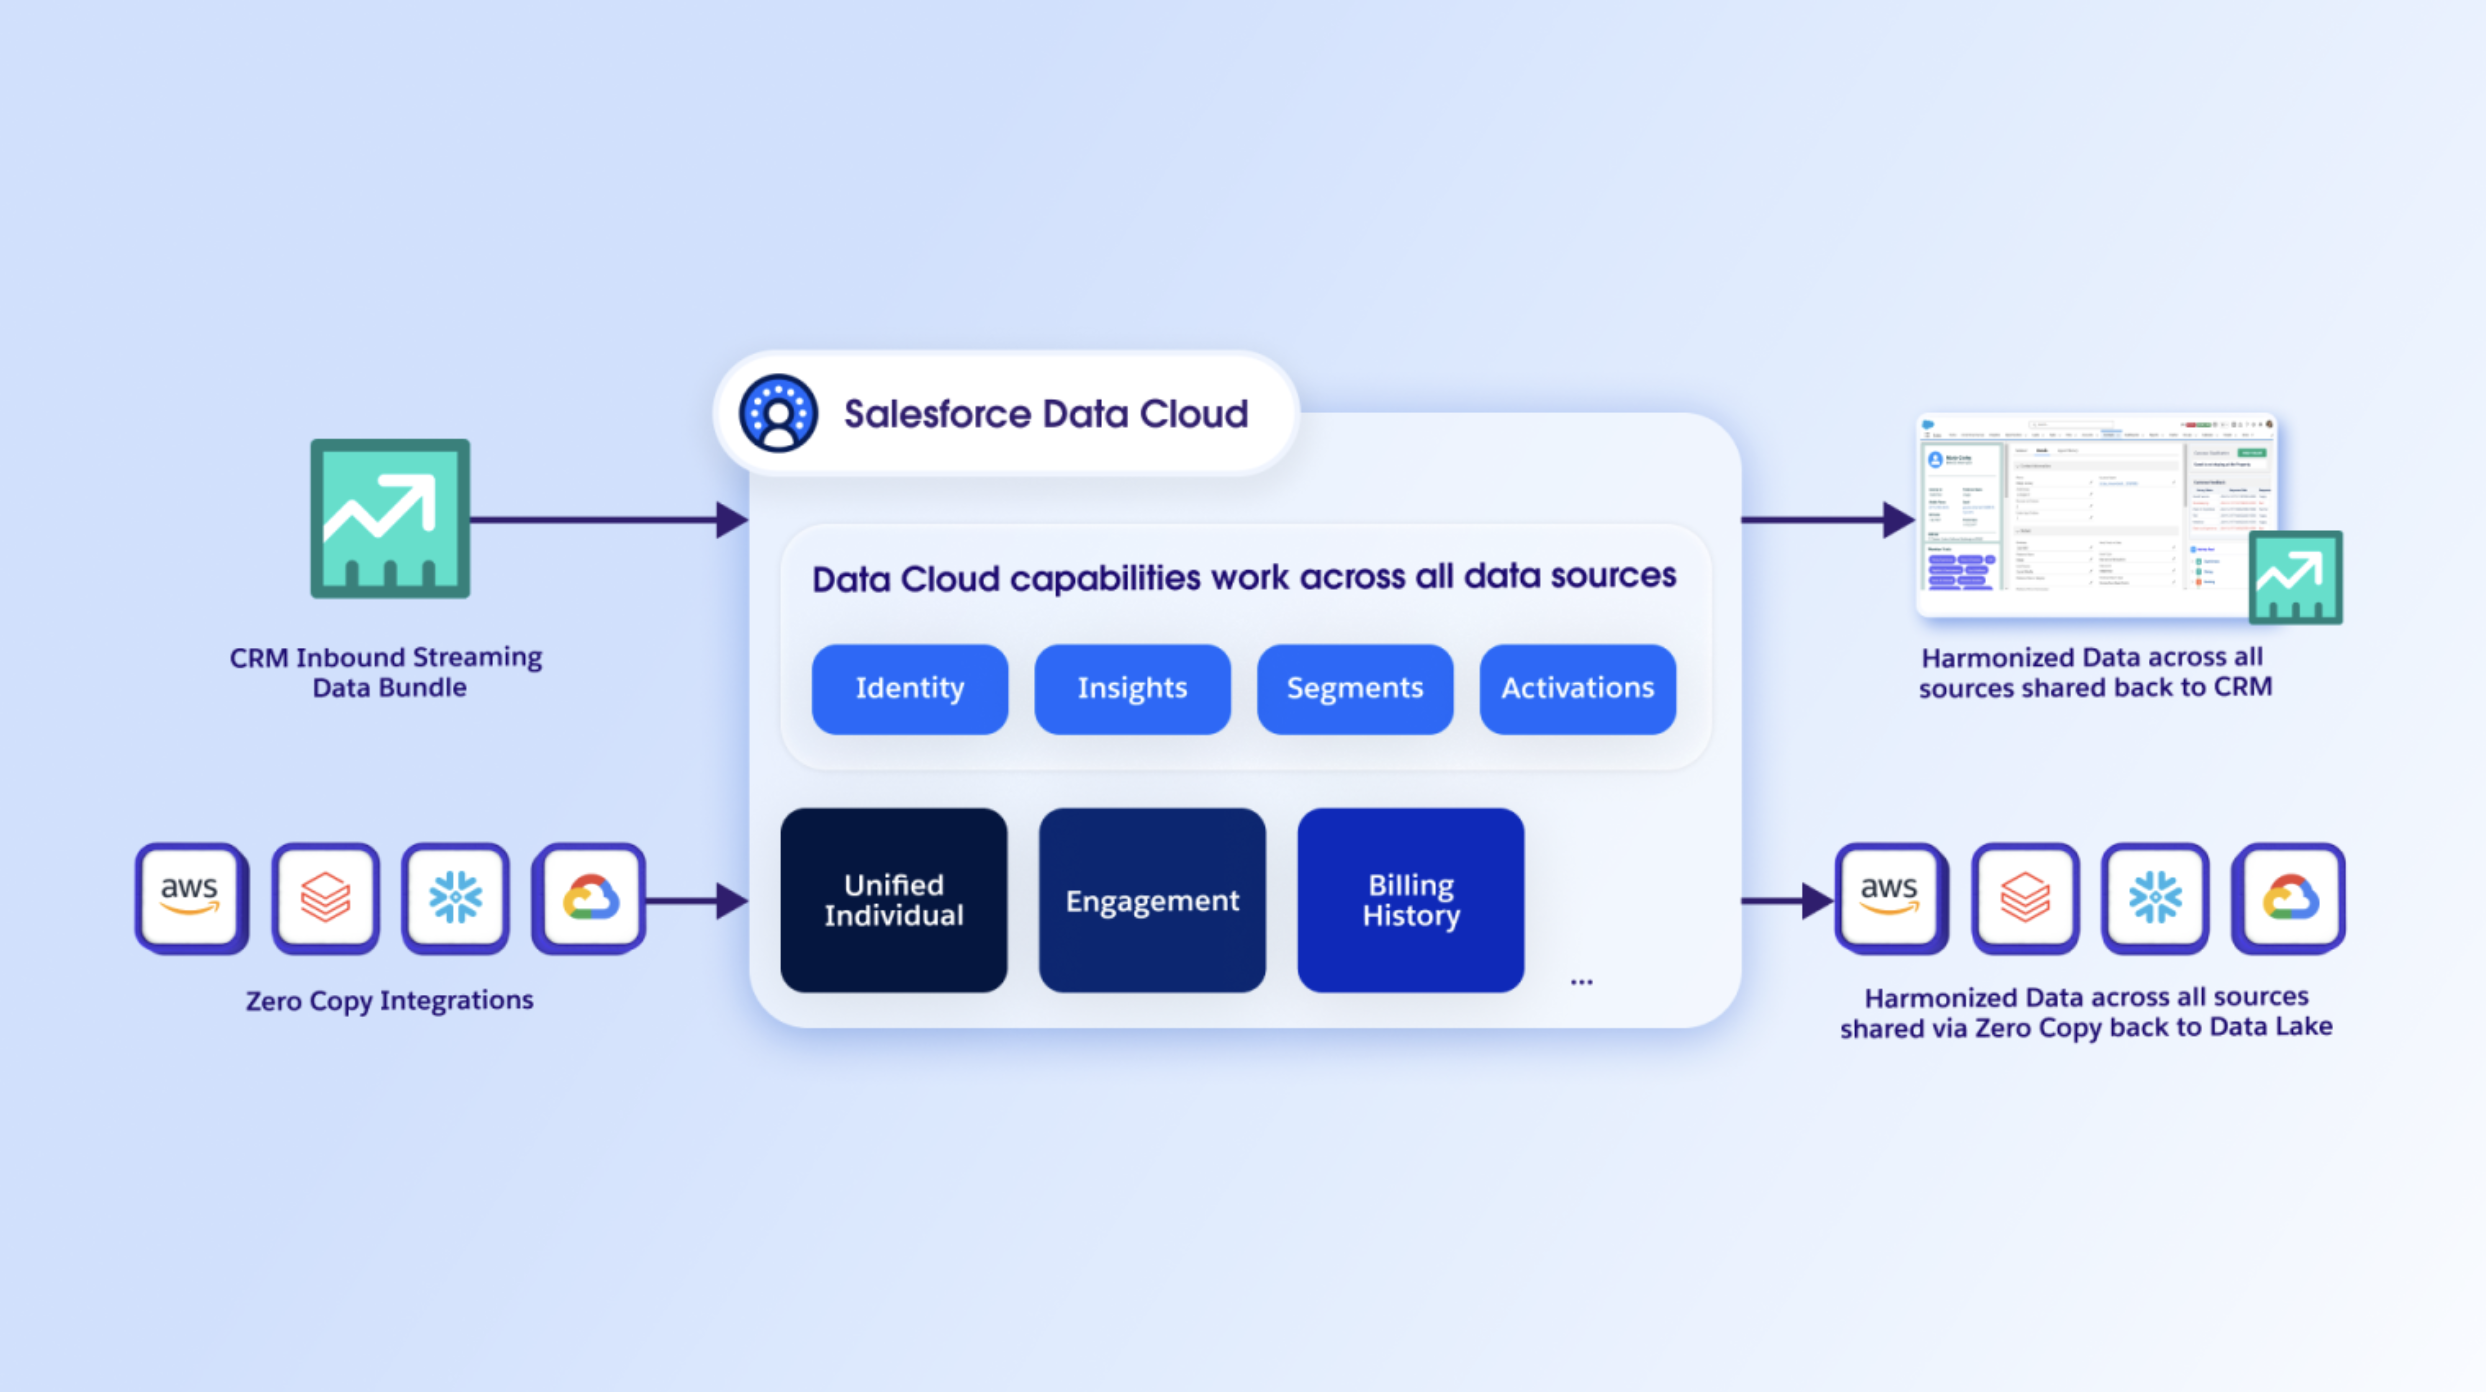
- Data In (Federation): External data sources, like your data warehouses or data lakes, are queried live by Salesforce Data Cloud. This means you can access and utilize data as if it were natively stored within Data Cloud, without physically copying it over. This federation capability operates in two primary modes: query federation and file federation.
- Data Out (Sharing): The rich, unified insights generated within Salesforce Data Cloud—including segmentation, identity resolution, and analytics—can be effortlessly integrated or shared back into your external data lake. This eliminates the need for any outbound ETL processes, ensuring real-time synchronization without duplication.
Practical Application: Connecting Google BigQuery to Salesforce Data Cloud with Zero-Copy Data Federation
Let’s illustrate the power of zero-copy with a real-world example: connecting Google BigQuery to Salesforce Data Cloud for seamless data federation. This innovative method allows you to access your valuable data stored in Google BigQuery directly within Salesforce Data Cloud, without any data replication.
The Zero-Copy Advantage in this Context:
- Real-time Data Access: Your Salesforce Data Cloud reflects the most up-to-date information from BigQuery, eliminating synchronization delays.
- Reduced Data Redundancy: No need to store duplicate data, saving on storage costs and simplifying data governance.
- Enhanced Data Security: Your data remains in BigQuery, minimizing exposure and maintaining your existing security protocols.
- Simplified Data Management: Focus on analysis and action, not on complex data movement processes.
Step-by-Step Connection Guide:
Here’s how to establish this powerful connection:
Part 1: Configuring Google Cloud for Seamless Integration
The first step involves setting up a secure bridge within your Google Cloud environment.
- Create a Dedicated Service Account:
- In Google Cloud Navigation menu, go to IAM and Admin > Service Accounts.
- Click + Create Service Account.
- Provide a name, ID, and description. Then click Create and continue.
- Grant Essential Roles: Assign the following roles to your new service account:
- BigQuery Metadata Viewer
- BigQuery Job User
- BigQuery Data Viewer
- BigQuery Read Session User
- Grant users access to this service account: This is to enable users to perform actions as a service account.
- Generate a Secure JSON Key:
- On the Service Accounts page, locate your new service account and click the three vertical dots under “Actions,” then click on “Manage keys.”
- Click +Add key and select Create new key. Choose the JSON option.
- A JSON file containing your private key will be downloaded. Store this file securely and do not share it. This key is crucial for authenticating the connection.
Part 2: Connecting in Salesforce Data Cloud
With your Google Cloud setup complete, it’s time to bring that data into Salesforce Data Cloud.
- Access Other Connectors:
- In Salesforce Data Cloud Setup, search for and select Other Connectors.
- Click New.
- Select Google BigQuery Connector:
- From the “Select Connector Type” window, choose Google Big Query connector and click Next.
- Configure the New BigQuery Source:
- Provide a Connection Name and Connection API Name.
- Enter the Service Account Email address of the service account you created in Google Cloud.
- Upload the SSH Private Key JSON file.
- Enter your Google Cloud Project ID. (You can find this by clicking the three vertical dots at the top right of your Google Cloud project page and selecting “Project settings.”)
- Click Test Connection. A message in green color will appear stating “Connection was established.”
- Click Save. Your new BigQuery Connection should now appear in the list of connectors with an “Active” status.
Part 3: Creating Your Data Stream
Now that the connection is established, you can define which BigQuery data you want to access in Salesforce Data Cloud.
- Initiate a New Data Stream:
- In Data Cloud, navigate to the Data Streams tab and click New.
- Under “Other Sources,” choose Google Big Query and click Next.
- Select Connection and Objects:
- In the New Data Stream window choose the Connection you just created.
- Select the Database (your Google Cloud project).
- All datasets in your project will appear under Schemas. Within each schema, select the desired Objects (Tables) that you wish to bring into Data Cloud. Click Next.
- Configure Object Details: For each selected object, define:
- An Object Name and Object API Name.
- The Object Category (e.g., Profile, Engagement, Other).
- The Primary Key field (composite keys can also be used).
- Choose the desired fields to include in your data stream. Click Next.
- Finalize and Deploy:
- Choose your desired Data Space.
- Click Deploy.
- You have the option to Enable Acceleration to turn on caching for improved performance.
Once these steps are successfully completed, your new data streams will appear in the Data Streams tab with an “Active” status, ready to power your Salesforce Data Cloud initiatives.
Practical Application: Sharing Data from Salesforce Data Cloud to Google BigQuery – The Zero-Copy Approach
Now, let’s explore the “Data Out” aspect of zero-copy, enabling you to effortlessly share enriched data from Salesforce Data Cloud directly into Google BigQuery. This method allows you to access your Data Cloud data directly in BigQuery without actually duplicating it, saving on storage and streamlining your data workflows.
The Zero-Copy Approach Explained:
Instead of physically copying your data, you’re creating a secure, live link between Data Cloud and BigQuery. This means your BigQuery queries will directly access the data residing in Data Cloud, ensuring you’re always working with the most up-to-date information without the overhead of ETL processes or redundant storage.
The Process at a Glance:
We’ll break this down into two main parts:
- Configuring Salesforce Data Cloud: Setting up your Data Share Target and creating the Data Share itself.
- Setting up Google Cloud: Ensuring the necessary permissions and subscribing to the shared data.
Let’s get into the details!
Part 1: Salesforce Data Cloud Configuration
This is where you’ll tell Data Cloud where you want your data to go and what data you want to send.
Step 1: Create a Data Share Target
The Data Share Target is essentially the destination point for your data in BigQuery.
- In Data Cloud, navigate to the Data Share Target tab and click New.
- Choose Google BigQuery connection and click Next.
- Fill in the details:
- Label: Give it a descriptive name (e.g., “BigQuery Target”).
- API Name: This will auto-populate.
- Google Cloud Principal: Enter the email of the Google account that will be accessing this data.
- Type: Select User.
- Click Save.
- You’ll be prompted to sign in with your Google Account. Authenticate your Google Cloud Principal account and review Salesforce’s Privacy Policy and Terms of Service. Then click Continue.
- You’ll be redirected back to the Data Share Target page. Verify that the status is Active and the Authentication Status is Successful.
Step 2: Create a Data Share and Link it to the Data Share Target
Now that you’ve defined the destination, you need to specify what data you want to share.
- Go to the Data Shares tab and click New.
- Enter the following:
- Data Share Label: (e.g., “Customer Profiles”)
- Data Share API Name: (auto-populates)
- Data Space: Select the relevant Data Space.
- Description (Optional): Add a brief explanation of what data is being shared.
- Click Next.
- Select the DLOs (Data Lake Objects), DMOs (Data Model Objects), and/or CIs (Calculated Insights) you wish to share. These are the specific data sets you want to expose to BigQuery.
- Click Save. Wait for the Data Share Status to change from Processing to Active. This might take a few moments.
- Once active, click the Link/Unlink Data Share Target button located at the top right corner of the Data Share page.
- Select the Data Share Target you created in the previous step.
- Click Save.
Congratulations! Your Data Share and Data Share Target are now successfully created and configured. The heavy lifting on the Salesforce side is done.
Part 2: Google Cloud Setup
Now, let’s switch gears to Google Cloud to access the shared data.
Step 1: Verify IAM Roles
Before proceeding, ensure your Google Cloud Principal account (the one you used for authentication) has the necessary IAM Roles. At a minimum, it should have:
- Analytics Hub Subscriber
- Analytics Hub Viewer
- BigQuery Admin
Step 2: Subscribe to the Data Cloud Listing
Salesforce Data Cloud publishes your shared data as a “listing” in Google Cloud’s Analytics Hub.
- In Google Cloud, open the Navigation menu (top left).
- Hover over BigQuery, then click on Sharing (Analytics Hub) under the Governance section.
- On the Sharing (Analytics Hub) page, click on Search listings.
- In the search box on the Published listings page, type “Data Cloud”.
- Look for a listing with a naming convention like listing_data_share_name_DATA_SHARE_TARGET_NAME. Select the desired listing.
- Click the + Subscribe button to create a linked dataset.
- Enter a Linked dataset name. Remember, this name can only contain lowercase letters and underscores.
- Click Save.
And that’s it! The linked dataset should now be available in your BigQuery project. You can now query this dataset as if it were a native BigQuery table, directly accessing your Salesforce Data Cloud information with the power of BigQuery.
Empower Your Business with Real-Time Data
Connecting Google BigQuery to Salesforce Data Cloud with the zero-copy approach, both for data federation and data sharing, empowers your organization with unparalleled access to real-time customer insights. This bi-directional integration is a game-changer for delivering hyper-personalized experiences, optimizing marketing campaigns, and making data-driven decisions with confidence.
Ready to unlock the full potential of your data? Contact us today to learn more about how Ateko can help you implement this powerful solution and transform your data strategy.